YOLO Fruit Detection Using Python: Build a Real-Time Fruit Detection System
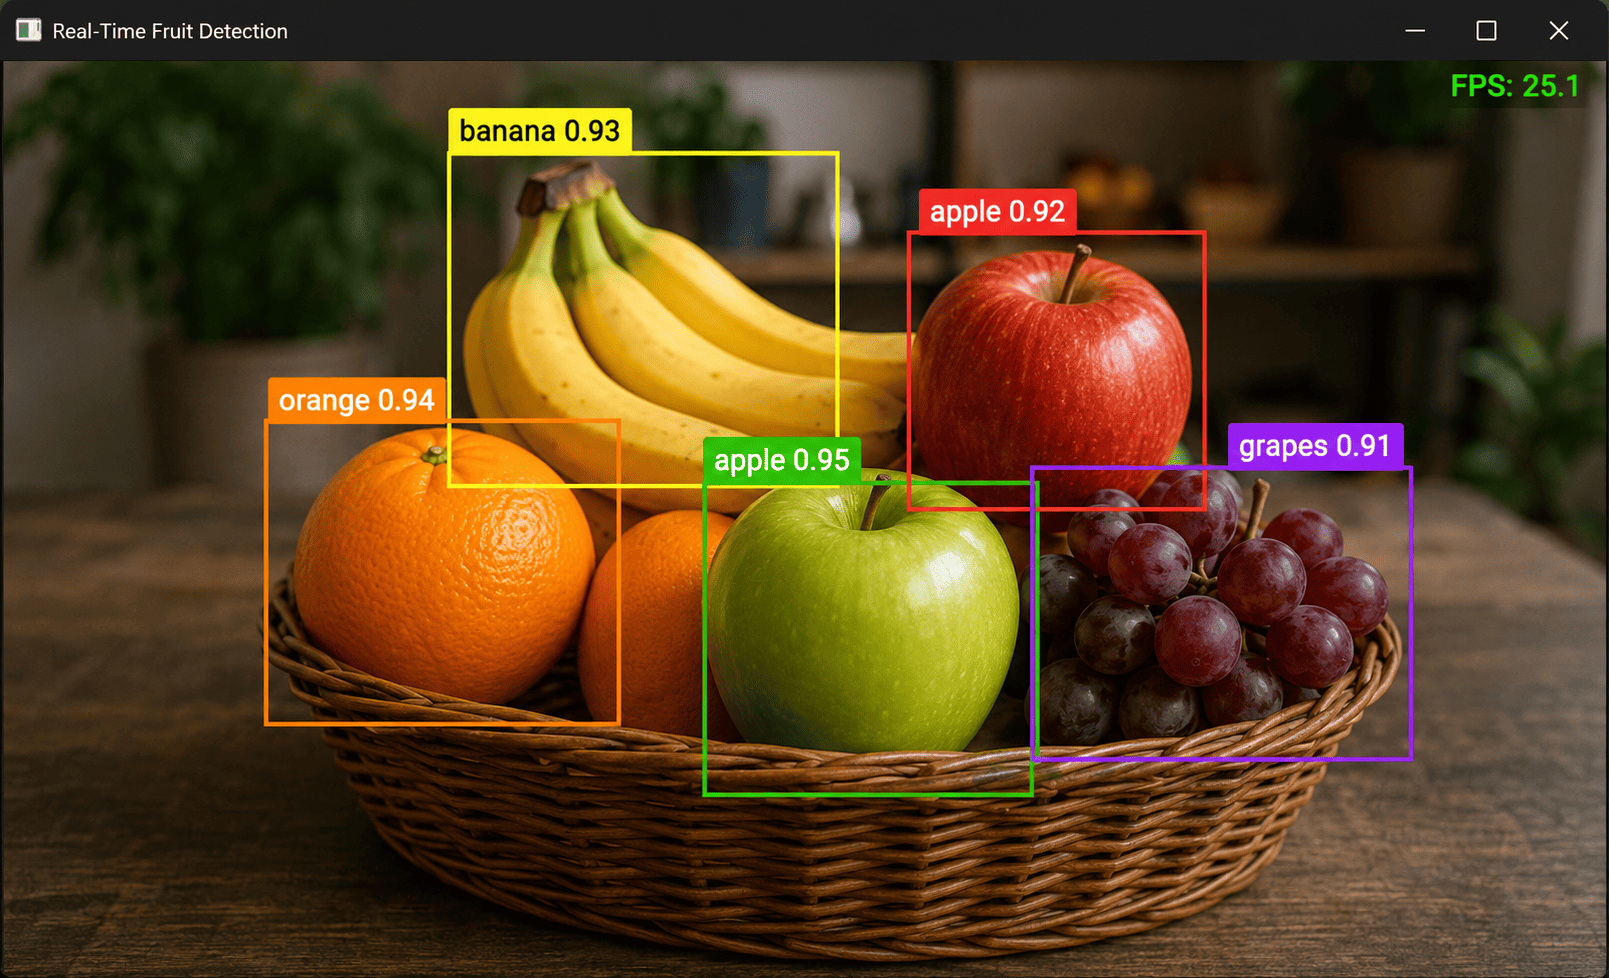
Fruit detection is a practical application of computer vision where artificial intelligence is used to automatically identify fruits in images and videos.
With modern object detection models such as YOLO (You Only Look Once), developers can build systems that detect multiple fruits, identify their locations, and estimate the confidence of each prediction in real time.
A fruit detection system can be used in agriculture, supermarkets, food processing, inventory management, automated checkout systems, and quality inspection.
In this tutorial, we will build a YOLO Fruit Detection System using Python. We will cover image detection, confidence filtering, webcam detection, video processing, and training a custom YOLO model for specific fruits.
What Is Fruit Detection?
Fruit detection is the process of identifying fruits within an image or video.
For example, an image might contain:
Apple
Banana
Orange
Mango
Pineapple
A computer vision model can identify each fruit and draw a bounding box around it.
The output might look like:
Apple      → 95% confidence
Banana     → 92% confidence
Orange     → 89% confidence
Mango      → 87% confidence
This allows software to understand what is present in an image.
What Is YOLO?
YOLO stands for You Only Look Once.
It is a family of real-time object detection models designed to detect and classify objects quickly.
Instead of using separate models for object localization and classification, YOLO performs these tasks together.
For each detected object, YOLO can provide:
Class name
Bounding box
Confidence score
For example:
Object: Apple
Confidence: 0.94

Bounding Box:
x1 = 120
y1 = 80
x2 = 350
y2 = 300
This makes YOLO useful for real-time fruit detection.
Technologies Used
We will use:
Python
YOLO
Ultralytics
OpenCV
Install the required libraries:
pip install ultralytics opencv-python
You can also create a requirements.txt file:
ultralytics
opencv-python
Then install them with:
pip install -r requirements.txt
Project Structure
Create a simple project:
yolo-fruit-detection/
│
├── images/
│   └── fruits.jpg
│
├── detect_image.py
├── webcam.py
├── detect_video.py
├── train.py
└── requirements.txt
The images directory will contain the images that we want to analyze.
1. Load the YOLO Model
Create a file called:
detect_image.py
Add:
from ultralytics import YOLO

model = YOLO("yolo11n.pt")

print("YOLO model loaded successfully")
The model will be downloaded automatically if it is not already available locally.
For custom fruit detection, we will later replace this model with a model trained specifically on fruit images.
2. Detect Objects in a Fruit Image
Let's start with a simple detection example.
from ultralytics import YOLO

model = YOLO("yolo11n.pt")

results = model("images/fruits.jpg")

for result in results:
    result.show()
Run:
python detect_image.py
The model will analyze the image and display the detection results.
If the model has been trained to recognize the fruits in the image, it will draw bounding boxes around them.
3. Save the Detection Result
Instead of displaying the result, we can save it to a new image.
from ultralytics import YOLO

model = YOLO("yolo11n.pt")

results = model("images/fruits.jpg")

for result in results:
    result.save(filename="detected_fruits.jpg")

print("Detection result saved")
After running the program, you will have:
detected_fruits.jpg
The output image will contain the detected objects and bounding boxes.
4. Get Fruit Detection Information
Sometimes we don't need the annotated image.
Instead, we may want to access the detection information programmatically.
from ultralytics import YOLO

model = YOLO("yolo11n.pt")

results = model("images/fruits.jpg")

for result in results:

    for box in result.boxes:

        class_id = int(box.cls[0])
        confidence = float(box.conf[0])

        class_name = result.names[class_id]

        print(
            f"Fruit: {class_name} | "
            f"Confidence: {confidence:.2f}"
        )
Example output:
Fruit: apple | Confidence: 0.95
Fruit: banana | Confidence: 0.92
Fruit: orange | Confidence: 0.89
This information can then be sent to another application or stored in a database.
5. Create a Fruit Class List
For a fruit detection application, we may only want to detect fruits.
For example:
FRUIT_CLASSES = {
    "apple",
    "banana",
    "orange",
    "mango",
    "pineapple",
    "watermelon",
    "grape",
    "strawberry"
}
We can then filter the model's predictions.
from ultralytics import YOLO

model = YOLO("yolo11n.pt")

FRUIT_CLASSES = {
    "apple",
    "banana",
    "orange",
    "mango",
    "pineapple",
    "watermelon",
    "grape",
    "strawberry"
}

results = model("images/fruits.jpg")

for result in results:

    for box in result.boxes:

        class_id = int(box.cls[0])
        confidence = float(box.conf[0])

        class_name = result.names[class_id]

        if class_name in FRUIT_CLASSES:

            print(
                f"Fruit: {class_name} | "
                f"Confidence: {confidence:.2f}"
            )
The important point is that the classes must actually exist in the model being used. If the pretrained model does not contain your required fruit classes, you need to train a custom model.
6. Add a Confidence Threshold
Not every prediction made by an AI model is reliable.
We can use a confidence threshold to ignore predictions with low confidence.
For example:
CONFIDENCE_THRESHOLD = 0.50
Then:
from ultralytics import YOLO

model = YOLO("yolo11n.pt")

CONFIDENCE_THRESHOLD = 0.50

results = model("images/fruits.jpg")

for result in results:

    for box in result.boxes:

        confidence = float(box.conf[0])

        if confidence < CONFIDENCE_THRESHOLD:
            continue

        class_id = int(box.cls[0])
        class_name = result.names[class_id]

        print(
            f"{class_name}: "
            f"{confidence:.2f}"
        )
You can experiment with:
0.30
0.40
0.50
0.60
0.70
A higher threshold usually produces fewer but more confident predictions.
7. Real-Time Fruit Detection With a Webcam
One of the most interesting applications is real-time fruit detection.
Create:
webcam.py
Then add:
import cv2
from ultralytics import YOLO

model = YOLO("yolo11n.pt")

camera = cv2.VideoCapture(0)

while True:

    success, frame = camera.read()

    if not success:
        break

    results = model(frame)

    annotated_frame = results[0].plot()

    cv2.imshow(
        "YOLO Fruit Detection",
        annotated_frame
    )

    if cv2.waitKey(1) & 0xFF == ord("q"):
        break

camera.release()
cv2.destroyAllWindows()
Run:
python webcam.py
Your webcam will open and the YOLO model will process the video frames in real time.
Press:
Q
to stop the program.
8. Custom Webcam Fruit Detection
We can also manually draw bounding boxes for only the fruits we want.
import cv2
from ultralytics import YOLO

model = YOLO("yolo11n.pt")

FRUIT_CLASSES = {
    "apple",
    "banana",
    "orange",
    "mango",
    "pineapple",
    "watermelon",
    "grape",
    "strawberry"
}

CONFIDENCE_THRESHOLD = 0.50

camera = cv2.VideoCapture(0)

while True:

    success, frame = camera.read()

    if not success:
        break

    results = model(frame)

    for result in results:

        for box in result.boxes:

            confidence = float(box.conf[0])

            if confidence < CONFIDENCE_THRESHOLD:
                continue

            class_id = int(box.cls[0])
            fruit = result.names[class_id]

            if fruit not in FRUIT_CLASSES:
                continue

            x1, y1, x2, y2 = map(
                int,
                box.xyxy[0]
            )

            label = f"{fruit} {confidence:.2f}"

            cv2.rectangle(
                frame,
                (x1, y1),
                (x2, y2),
                (0, 255, 0),
                2
            )

            cv2.putText(
                frame,
                label,
                (x1, y1 - 10),
                cv2.FONT_HERSHEY_SIMPLEX,
                0.6,
                (0, 255, 0),
                2
            )

    cv2.imshow(
        "Fruit Detection",
        frame
    )

    if cv2.waitKey(1) & 0xFF == ord("q"):
        break

camera.release()
cv2.destroyAllWindows()
This gives us more control over the detection process.
9. Detect Fruits From a Video
YOLO can also process recorded videos.
Create:
detect_video.py
Then:
from ultralytics import YOLO

model = YOLO("yolo11n.pt")

results = model.predict(
    source="fruits.mp4",
    save=True,
    conf=0.50
)

print("Video processing completed")
Run:
python detect_video.py
The processed video will be saved by the YOLO framework.
This can be useful for:
Supermarket videos
Farm monitoring
Fruit sorting videos
Food processing systems
Agricultural research
10. Process Video Frame by Frame
For more control, OpenCV can be combined with YOLO.
import cv2
from ultralytics import YOLO

model = YOLO("yolo11n.pt")

video = cv2.VideoCapture("fruits.mp4")

while True:

    success, frame = video.read()

    if not success:
        break

    results = model(frame)

    frame = results[0].plot()

    cv2.imshow(
        "Fruit Detection",
        frame
    )

    if cv2.waitKey(1) & 0xFF == ord("q"):
        break

video.release()
cv2.destroyAllWindows()
This approach allows you to add custom processing logic to every video frame.
11. Why Custom Training Is Important
A general-purpose YOLO model may not be suitable for every fruit detection project.
Suppose you want to detect:
Red Apple
Green Apple
Mango
Papaya
Dragon Fruit
Passion Fruit
Wood Apple
The model may not have these exact classes.
In that situation, you should create a custom fruit dataset.
The general workflow is:
Collect Fruit Images
        ↓
Annotate Images
        ↓
Create YOLO Dataset
        ↓
Train Model
        ↓
Validate Model
        ↓
Test Model
        ↓
Deploy
12. Create a Fruit Dataset
A YOLO dataset can be structured like this:
fruit-dataset/
│
├── images/
│   ├── train/
│   └── val/
│
├── labels/
│   ├── train/
│   └── val/
│
└── data.yaml
For every image, there should be a corresponding label file.
For example:
images/train/mango01.jpg
labels/train/mango01.txt
13. YOLO Annotation Format
YOLO uses normalized bounding-box coordinates.
Each label contains:
class_id center_x center_y width height
Example:
0 0.512 0.438 0.420 0.650
The values are normalized between 0 and 1.
For example:
0
could represent:
Apple
while:
1
could represent:
Banana
14. Create data.yaml
Create a file called:
data.yaml
Example:
path: ./fruit-dataset

train: images/train
val: images/val

names:
  0: apple
  1: banana
  2: mango
  3: orange
  4: pineapple
  5: watermelon
The class IDs must match the class IDs used in your annotation files.
15. Train a Custom Fruit Detection Model
Once the dataset is prepared, create train.py:
from ultralytics import YOLO

model = YOLO("yolo11n.pt")

model.train(
    data="data.yaml",
    epochs=50,
    imgsz=640,
    batch=16
)
Run:
python train.py
The model will learn the visual characteristics of the fruits in your dataset.
During training, the model learns patterns such as:
Shape
Color
Texture
Size
Surface patterns
Object boundaries
16. Train Using the Command Line
You can also start training directly from the terminal:
yolo detect train \
    data=data.yaml \
    model=yolo11n.pt \
    epochs=50 \
    imgsz=640
Depending on your hardware, training time can range from several minutes to many hours.
A GPU is recommended for larger datasets and models.
17. Test the Custom Model
After training, the trained model can be loaded.
from ultralytics import YOLO

model = YOLO(
    "runs/detect/train/weights/best.pt"
)

results = model(
    "test_fruit.jpg",
    conf=0.50
)

for result in results:
    result.show()
The best.pt file contains the trained model weights.
18. Fruit Counting
YOLO detection can also be used to count fruits.
For example:
from ultralytics import YOLO

model = YOLO("best.pt")

results = model("fruit.jpg")

fruit_count = 0

for result in results:

    for box in result.boxes:

        fruit_count += 1

print("Total fruits:", fruit_count)
If the image contains 8 fruits, the output could be:
Total fruits: 8
This can be extended to count individual fruit types.
For example:
from collections import Counter
from ultralytics import YOLO

model = YOLO("best.pt")

results = model("fruit.jpg")

fruit_counts = Counter()

for result in results:

    for box in result.boxes:

        class_id = int(box.cls[0])
        fruit_name = result.names[class_id]

        fruit_counts[fruit_name] += 1

print(fruit_counts)
Example:
Counter({
    'apple': 5,
    'banana': 3,
    'orange': 2
})
This type of functionality can be useful for automated inventory systems.
19. Applications of Fruit Detection
YOLO fruit detection has many practical applications.
Smart Agriculture
Farmers can use cameras and AI to automatically detect fruits on plants.
The system could estimate the number of fruits and monitor crop development.
Automated Fruit Sorting
Food processing facilities can use computer vision to identify and sort fruits.
A conveyor belt camera could detect each fruit and send information to a sorting system.
Fruit Counting
Computer vision can automatically count fruits in an image or video.
This can help estimate crop production.
Supermarket Inventory
A camera system could detect fruits and help monitor inventory levels.
Automated Checkout
Computer vision can potentially identify products without requiring manual barcode scanning.
Fruit Quality Inspection
A custom model can be trained to detect:
Damaged fruit
Rotten fruit
Bruised fruit
Unripe fruit
Ripe fruit
This requires a specialized dataset containing examples of each condition.
20. Fruit Ripeness Detection
Object detection can be extended to fruit ripeness classification.
For example, a custom dataset could contain:
Mango_Raw
Mango_Ripe
Mango_Overripe
The model can then classify the detected mango based on its visual appearance.
Example:
from ultralytics import YOLO

model = YOLO("mango_ripeness.pt")

results = model("mango.jpg")

for result in results:

    for box in result.boxes:

        class_id = int(box.cls[0])
        confidence = float(box.conf[0])

        class_name = result.names[class_id]

        print(
            f"{class_name}: "
            f"{confidence:.2f}"
        )
Example output:
Mango_Ripe: 0.93
The accuracy of such a system depends heavily on the quality and diversity of the training dataset.
21. Improving Fruit Detection Accuracy
Several techniques can improve model performance.
Use a Diverse Dataset
Include fruits photographed from different:
Angles
Distances
Lighting conditions
Backgrounds
Camera types
Include Occluded Fruits
Some fruits may be partially hidden behind leaves or other fruits.
Training with these examples can make the model more robust.
Use Data Augmentation
Common augmentation techniques include:
Rotation
Scaling
Cropping
Flipping
Brightness adjustment
Contrast adjustment
Improve Image Quality
High-quality images can help the model identify small fruits and subtle visual differences.
Tune the Confidence Threshold
Experiment with different confidence thresholds based on the requirements of your application.
22. Evaluate the Model
A fruit detection model should be evaluated using appropriate metrics.
Important metrics include:
Precision
Measures how many detected objects are correct.
Precision =
True Positives /
(True Positives + False Positives)
Recall
Measures how many actual fruits were detected.
Recall =
True Positives /
(True Positives + False Negatives)
IoU
Intersection over Union measures how well the predicted bounding box overlaps the actual fruit.
IoU =
Intersection Area /
Union Area
mAP
Mean Average Precision is commonly used to evaluate object detection models.
23. Complete Fruit Detection Example
Here is a simple complete webcam application:
import cv2
from ultralytics import YOLO

MODEL_PATH = "best.pt"
CONFIDENCE_THRESHOLD = 0.50

model = YOLO(MODEL_PATH)

camera = cv2.VideoCapture(0)

while True:

    success, frame = camera.read()

    if not success:
        break

    results = model(frame)

    for result in results:

        for box in result.boxes:

            confidence = float(box.conf[0])

            if confidence < CONFIDENCE_THRESHOLD:
                continue

            class_id = int(box.cls[0])
            fruit = result.names[class_id]

            x1, y1, x2, y2 = map(
                int,
                box.xyxy[0]
            )

            label = f"{fruit} {confidence:.2f}"

            cv2.rectangle(
                frame,
                (x1, y1),
                (x2, y2),
                (0, 255, 0),
                2
            )

            cv2.putText(
                frame,
                label,
                (x1, y1 - 10),
                cv2.FONT_HERSHEY_SIMPLEX,
                0.6,
                (0, 255, 0),
                2
            )

    cv2.imshow(
        "YOLO Fruit Detection",
        frame
    )

    if cv2.waitKey(1) & 0xFF == ord("q"):
        break

camera.release()
cv2.destroyAllWindows()
Replace:
best.pt
with the path to your trained fruit detection model.
Conclusion
YOLO provides a powerful and flexible way to build fruit detection applications using Python.
A basic system can detect fruits from images, while a more advanced system can process live camera streams, count fruits, monitor inventory, identify fruit types, and even detect fruit quality or ripeness.
The basic workflow is:
Camera / Image
      ↓
YOLO Model
      ↓
Object Detection
      ↓
Fruit Classification
      ↓
Confidence Filtering
      ↓
Bounding Boxes
      ↓
Counting / Analysis
      ↓
Application
For simple experiments, a pretrained model can be a good starting point. However, for specialized fruits or applications such as ripeness detection and quality inspection, a custom YOLO dataset and trained model will usually be required.
With YOLO, Python, and OpenCV, developers can build everything from a simple fruit detector to a complete AI-powered agricultural or food-processing system.